Ekstrak/download data SAP menggunakan Biztalk Adapter di SSIS


Arsitektur nya ada sebagai berikut:

Arsitektur SAP Biztalk adapter

Setup untuk Environment SAP:

  1. Install custom RFC yang didownload dari situs Microsoft, step instalasi ada di https://msdn.microsoft.com/en-us/library/cc185473%28v=bts.10%29.aspx

Setup untuk Client 32 bit:

  1. SQL Server Integration Services (SSIS) (32-bit) or Visual Studio (32-bit) setup
  2. .NET Framework 3.0 Redistributable (32-bit) Package setup
  3. Windows, SQL Server, .NET Framework, Visual Studio Service pack setup
  4. RFCSDK 7.0 (Unicode) (32-bit) download and setup. File copy to c:\windows\system32
  5. (*) R3DLLINS.exe download and setup for SAP release 6.40 and 7.00
  6. (*) vcredist_<platform>.exe (32-bit) download and setup for SAP release 4.6D EX2, 6.40 EX2, 7.10
  7. WCF LOB Adapter SDK (32-bit) Setup, https://www.microsoft.com/en-us/download/details.aspx?id=39630
  8. BizTalk Adapter Pack (32-bit) setup, https://www.microsoft.com/en-us/download/details.aspx?id=38170

Setup untuk Client 64 bit:

  1. SQL Server Integration Services (SSIS) (64-bit) or Visual Studio (64-bit) setup
  2. .NET Framework 3.0 Redistributable (64-bit) Package setup
  3. Windows, SQL Server, .NET Framework, Visual Studio Service pack setup
  4. RFCSDK 7.0 (Unicode) (32-bit) download and setup. File copy to c:\windows\sysWOW64
  5. RFCSDK 7.0 (Unicode) (64-bit) download and setup. File copy to c:\windows\system32
  6. (*) R3DLLINS.exe download and setup for SAP release 6.40 and 7.00
  7. (*) vcredist_<platform>.exe (32-bit) download and setup for SAP release 4.6D EX2, 6.40 EX2, 7.10
  8. WCF LOB Adapter SDK (64-bit) Setup, https://www.microsoft.com/en-us/download/details.aspx?id=39630
  9. BizTalk Adapter Pack (32-bit) setup dan BizTalk Adapter Pack (64-bit), https://www.microsoft.com/en-us/download/details.aspx?id=38170


Cara menggunakan Biztalk Adapter di SSIS yaitu:

  1. Buka BI Development Studio (BIDS), kemudian pilih project SSIS
  2. Buat Connection baru, pilih ADO.NET lalu klik Add01 SSIS Add connection manager
  3. Pada Configure ADO.NET Connection Manager, klik tombol New02 SSIS configure connection manager
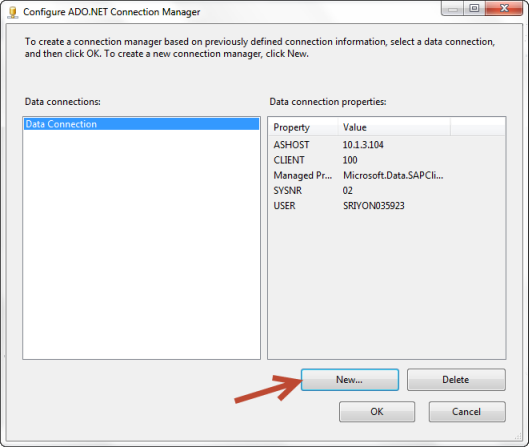
  4. Pada pilihan Provider, pilih Data Provider for SAP03 SSIS choose data provider
  5. Kemudian isi informasi koneksi ke SAP, antara lain:
    1. Application Server Host, isi dengan IP Address SAP
    2. User Name
    3. Password
    4. Client
    5. System Number04 SSIS fill connection info
  6. Klik tombol Test Connection untuk memastikan koneksi ke server SAP berhasil lalu klik tombol OK. Beri nama connection tersebut menjadi TU_ADO_SAP_BW
  7. Pada SSIS Folder, buat New SSIS Package
  8. Drag and drop Data Flow Task di SSIS Toolbok ke package yang baru dibuat05 Add data flow task
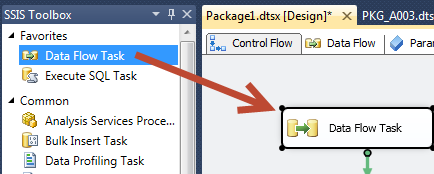
  9. Double Kllik Data Flow Task dan kita akan masuk ke Data Flow, Lalu drag and drop ADO Net Source ke canvas Data Flow.06 Add ADO Net connection
  10. Double klik pada ADO Net Source, dan isi pada ADO.Net Source Editor seperti isian dibawah:07 select data sap
  11. Klik tombol Preview untuk memastikan datanya ada, lalu klik tombol Close dan OK.08 preview data sap
  12. Data dari SAP siap diEkstrak, selanjutnya anda bisa langsung membuat data destinationnya seperti biasa.09 preview adonet


Ipad / Iphone – Unlock passcode restriction


Pada iphone/ipad ada menu restriction, menu ini berfungsi untuk mengatur permission pada aplikasi tertentu, sehingga untuk membuka aplikasi yang sudah disetup restriction diperlukan memasukan passcode. Jika anda mengalami lupa passcode maka aplikasi-aplikasi tersebut tidak akan bisa dibuka.
01 passcode restriction

Untuk meng-unlock passcode pada iphone/ipad dapat melakukan langkah-langkah berikut, Sebelum mulai agar melakukan backup terlebih dahulu dengan menggunakan iTunes, caranya:

  1. Connect iphone/ipad ke komputer
  2. Buka iTunes dan lakukan backup
  3. Setelah backup selesai, tutup iTunes namun biarkan iphone/ipad tetap terhubung ke komputer.
    itunes backup

Cara reset:

  1. Install iBackupBot
  2. Buka Aplikasi iBackupBot, kemudian masuk ke menu: System Files -> HomeDomain -> Library -> Preperences -> Buka file com.apple.restrictionspassword.plist
    02 ibackupbot
  3. Buka link http://ios7hash.derson.us/ kemudian masukan No 1 dan 2 di step 2 ke No 1 dan 2 di step ini seperti pada gambar dibawah, kemudian klik pada “Search for Code
    03 recovery passcode
  4. Dan passcode anda akhirnya ketemu, passcode bisa langsung digunakan diiphone/ipad.

Outlook 2013: Working with Tasks (How To and Tips)


Source: Plan and Simple Microsoft Outlook 2013, Jim Boyce (2013)

At one time or another, most of us have written a to-do list—a list of tasks that we need to perform. Maybe you put together a list of the improvements or repairs you want to make to your house. Maybe it’s something simpler such as a list of errands to run. Whatever the case, having a list of the tasks can be valuable for keeping you on track.

Microsoft Outlook 2013 includes a feature to help you keep your pending tasks in mind. The Tasks folder stores your to-do list. You can create tasks for yourself, assign them a due date, and easily mark them as completed. You can create one-time tasks or recurring tasks. Outlook also lets you assign tasks to others and receive status updates on the tasks from the people to whom you assign them. This section explains how to use the Tasks folder to create and manage one-time and recurring tasks as well as how to assign tasks to others

  1. Working in Tasks folder

Outlook 2013 includes a Tasks folder that you can use to store your tasks as well as those that you assign to others. The Tasks folder offers a variety of ways to view and work with your tasks, including the daily task list that appears at the bottom of the calendar and the Tasks List in the To-Do Bar.

mas-bas-1

2. Viewing Task

With Outlook 2013, you can view your task list in various loca-tions in Outlook so that you can not only access your task items to work on them, but also see a summary list of all your pending tasks, tasks due that day, and so on. You can view your tasks in the Tasks folder, or you can use the task list in the Calendar and To-Do Bar to view and work with tasks.

mas-Bas-2

3. Adding Task

Tasks can be added to your Outlook 2013 Tasks folder in one of two ways. You can create the task yourself, or you can accept a task that someone else assigns to you. If you create the task yourself, you can set it up by using the New Items button on the Home tab for any folder, or you can create it through the Tasks folder.

mas-bas-3

4. Working with Recurring Task

Some tasks that you create in Outlook 2013 are of a recurring nature—they repeat on a regular basis. For example, maybe you have to prepare a set of reports every Friday that summarizes the week’s sales or other information. Or perhaps you need to back up your files every week. Although a recurring task shows up only once in the task list, it appears in the tasks lists in the calendar and on the To-Do Bar when the assigned due date falls in the list’s range. If you set a reminder for the task, you receive the reminder for each recurrence of the task.

mas-bas-4

5. Modifying and Updating Task

You can modify a task in Outlook 2013 at any time to change any property, including subject, due date, recurrence, and so on. Another change you might want to make to tasks is to mark them as complete so that you can see at a glance the tasks that are finished and those that are not. You can also change the view of the Tasks folder to show only tasks that are complete, only tasks that are overdue, only those that are incomplete, and so on. In addition to marking tasks complete, you probably want to delete completed tasks and send status updates for tasks that are assigned to you.

mas-bas-5

6. Inserting an Outlook Item Into A Task

When you create a task in Outlook 2013—whether you create the task for yourself or assign it to someone else—you might want to add items to the task. For example, assume that you’re going to assign a task to someone else, and that person needs a copy of a Microsoft Word document to perform the task. You can attach the document to the task. Or, perhaps you need to include some contacts with a task. Whatever the case, it’s easy to insert Outlook items, objects, and files into a task.

mas-bas-6

mas-bas-66

7. Inserting a file into a task

In addition to inserting Outlook items, you can insert documents and other types of files. For example, you might want to insert a project plan, report, or other document into a task so that when you’re working on that task, you have the documents handy.

mas-bas-7

8. Assigning a task to someone else

If you manage others and use Outlook in your organization for email and collaboration, you probably want to assign tasks to others. Outlook 2013 sends the task assignment as an email message, and the assignee has the option of accepting or rejecting the task. When you assign a task, you define a status update distribution list. The people on that list receive status reports when the assignee makes changes to the task.

mas-bas-8

9. Accepting or rejecting assigned tasks

If someone assigns a task to you, the task assignment comes to you in the form of an email. You then must either accept or reject the task. Or, you can accept the task and then assign it to someone else.

mas-bas-9

Cara Mendapatkan Sertifikasi Oracle


Tanggal 17 Desember kemaren, saya baru saja ikut sertifikasi Oracle Business Intelligence, bagi teman-teman yang ingin mendapatkan sertifikasi oracle berikut adalah caranya:

  1. Pilih sertifikasi oracle yang sesuai dengan kemampuan anda, sertifikasi oracle sendiri banyak, mulai dari Oracle database, middleware dsb. Anda bisa melihat daftar sertifikasi oracle disitus oracle.com
  2. Sebaiknya cari latihan soal / exam mengenai materi ujian sertifikasi oracle, anda bisa cari diinternet, karena biasanya banyak situs yang menjual latihan soal ujian sertifikasi oracle, namun jangan percaya 100% dengan jawaban dari latihan soal tersebut, anda harus memverifikasinya karena pengalaman saya beberapa jawaban dari latihan soal tersebut ada yang tidak benar.
  3. Daftar ke PersonVue, pada situs ini anda akan diminta memilih jenis sertifikasi, kode sertifikasi oracle, lokasi tempat ujian, informasi anda dan pembayaran ujian sertifikasi dengan menggunakan kartu kredit. Jika anda tidak punya kartu kredit sebaiknya pinjam punya teman, karena kalau pembayaran tidak dilakukan makan proses pendaftaran tidak akan berhasil.
  4. Cek Email anda, karena setelah anda amengisi di PersonVue anda akan dikirimkan informasi dari PersonVue mengenai informasi yang anda isi di PersonVue, jika ada informasi yang tidak sesuai atau ingin mengubah jadwal ujian anda bisa login ke PersonVue dan mengubahnya.
  5. Datang ke lokasi ujian 30menit sebelum waktu ujian
  6. Ujian sertifikasi Oracle, Ujian ini saya ambil dikampus UI salemba Gedung C Fakultas teknik, pada saat ujian, peserta ujian akan diberikan ruangan khusus, waktu itu hanya ada 4 PC untuk ujian dan dimonitor oleh pengawas melalui CCTV. Barang-barang seperti tas, handphone, buku, laptop dsb dititipkan di loker khusus
  7. 30 menit setelah ujian cek email anda karena akan ada informasi hasil ujian anda apakah lulus atau tidak
  8. Buat account di oracle.com, untuk melihat hasil score ujian anda, melihat history sertifikasi oracle yang anda ambil dan status pengiriman sertifikasi oracle.
  9. Kalau anda lulus ujian, sertifikasi oracle akan dikirimkan melalui pos ke alamat anda paling lambat 8 minggu setelah hasil ujian keluar.

Semoga bermanfaat.

Review Book: Buku yang wajib dibaca untuk mahir Oracle GoldenGate


Berikut adalah buku-buku yang saya baca pada saat implementasi goldengate di suatu project, tentu saja masih banyak buku-buku yang lain, tetapi saya merekomendasikan 4 buku ini anda baca dahulu untuk mahir goldengate.

1. Oracle GoldenGate Windows and UNIX Administrator’s Guide, Sesuai dengan keynote oracle, learn Oracle from Oracle, maka buku ini wajib dibaca,  terutama bagi yang belum mengenal Goldengate, dibuku ini dijelaskan secara detil dan sederhana topologi goldengate dan contohnya.

Image

2. Oracle GoldenGate Windows and Unix Reference Guide, dari judulnya sendiri kita sudah tahu ini adalah buku referensi, sehingga jika kita ingin mengetahui deskripsi dan parameter apa saja yang sebaiknya digunakan maka bisa melihatnya disini.

Image

3. Oracle GoldenGate 11g Implementer, Buku ini secara ringkas membantu kita untuk dapat dengan cepat mengerti dalam implementasi GoldenGate, didalamnya sendiri ada tip dan trik untuk implementasi Goldengate.

Image

4. Expert Oracle GoldenGate, Sesuai dengan judulnya ini adalah buku lanjutan untuk yang ingin memperdalam GoldenGate.

Image

Anda punya buku lain yang direkomendasikan, silahkan komentar disini,,

Semoga Bermanfaat…